

How To Inlay Abalone & Mother of Pearl Shell
Green Abalone |
|
|
| Red Abalone Heart not available |
|
|


| Pale Red Abalone | Mother of Pearl | Korean Awabi |
|
|
|
HEALTH-SAFETY NOTICE:
Dust from cutting, sanding, grinding, breaking precious shell and or Abalone have been known to cause adverse health conditions, Overexposure to fine dust can make you seriously ill or can cause silicosis, a lung disease which is potentially fatal. With that being said it’s important to always wear the proper OSHA-approved respirator when cutting to avoid inhalation of any dust particles from the shell.
CUTTING TOOLS/TECHNIQUES:
The most common way to cut shell when inlaying wood work is by using a jewelers or coping saws in combination with A Dremel moto-tool (small Rotary saw) and needle or mill files for best results and accuracy. Lutherie and Lapidary suppliers often have a good selection of fine tools to assist in the process
How To Cut Shell basic Video by Ron Percell
Shell may also be cut/scored with a sharp x-acto knife making several gentle passes over your pattern lines until cut through. This technique is used when making inlayed centers for Reverse Glass Gilded letters. The shell may also be masked with vinyl (blasting resist mask) and sand blasted with Aluminum Oxide to get fine lines and detail. The shell can be clear coated with laquer or varnishes and then cut under water with scissors. Bandsaws can be used and work best with the smallest of blades available Shell may also be softened in Salt water then molded into shape and then clamped to be left to until completely dry. Keep in mind that shell is very hard and that it may be easier to use a coping saw on some angles verses sanding or filing due to how hard yet fragile the shell is. I’ve placed a design of a cutting board on the other side of this document, made from hardwood that can assist when using a Jeweler’s or Coping saw. If you make a cut board, make sure that the cut board fits the tolerances of your saw.
EXAMPLE OF CUTTING BOARD MADE FROM HARDWOOD FOR JEWELERS OR COPING SAW
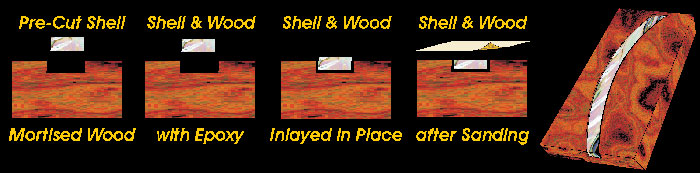
WOOD INLAY:
For wood inlay such as Marquetry & Parquetry, take the design you wish to make and make it into a working pattern, the pattern is then used for transferring the design to the shell and the wood being inlayed. The shell is then cut in the shape of your design. Next the shell is glued to the surface of the wood in the position desired for inlay with adhesive such as the name brand “DUCO” or contact cement, carefully avoiding excess glue beyond the edges of the shell. Once dry you may use a sharp pointed object such as a scribe x-acto knife or even a pencil to scribe around the edges of the shell design. After scribing use Acetone (make sure to protect any finished surface or joints as acetone will damage them) to soften and gently remove the shell form the wood and to clean both shell and wood free of glue for later use. As always use the proper OSHA approved masks for safety purposes. Now that the wood surface is clean and free of any adhesive you will see the lines scribed on the surface in which you will now be able to begin routing out a mortise(slot) in which to seat the shell. Route a trough/mortise slightly less shallow than the shell thickness being used. Once finished with the inlay mortise you may Epoxy the shell into the mortises area, many inlay craftsmen use epoxy mixed with the dust of the wood being inlayed to act as the adhesive and the filler in one, to match the color of the wood as closely as possible. Once your epoxy of choice has dried thoroughly, you may then use a series of sand paper (working from coarse, medium, to fine) from 80-600 grit to begin leveling any excess epoxy and raised surfaces of shell until smooth and clean. After leveling is finished, you now ready for finishing your project with the top coat of your choice to finish you’re wood project.
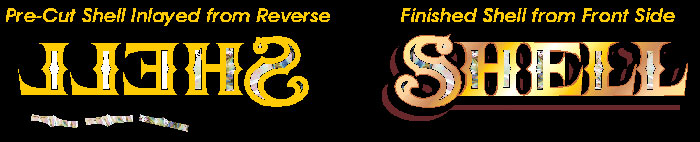
GLASS SIGNS & DECORATION:
The use of precious shell had been used for many years in Reverse Glass gilding for numerous areas such as in decorative centers of letters, as well as the entire letter faces, and as for fill in backgrounds and decorative boarders. The techniques for cutting are the same as mentioned prior. Designs desired are cut from shell, then affixed into place. There are numerous techniques for affixing shell to glass based on personal preferences that are listed below. Some of the first techniques used involved embedding the cut shell into Thick Bodied Damar varnish (we recommend “Gilder’s Brand”, 3 times thicker than Artists damar) that has been mixed well with a quick drying varnish as a hardener and resin gel as a filler to keep a heavy body to the varnish. The Damar mixture is then applied to the area and then the shell is embedded into the mixture which serves as the adhesive. Another technique is to use a cathedral grade of U.V. Adhesive (we recommend “Gilder’s Brand”) in which the adhesive is applied to both surfaces (Shell & Glass) then placed into position, the U.V. Adhesive is then set/hardened by exposing to Ultra-Violet rays from the sun or using a U.V. Light with the appropriate amount of exposure as recommended by supplier of the glue to set/harden. In the past shell was affixed to glass by using a hi-clarity cyanoacrylate known as “Pacer or Crazy glue”, but availability and durability are poor, and often can attack enameled surfaces leaving undesired results. One final method is to Clear coat the shell with a heavy Lacquer finish, then place into position and adhere only the corners with a small amount of clear in order to pin into position. This technique can help avoid De-lamination issues from the use of Crazy Glues, but does not have as high of luster that results in using the U.V. Adhesive, which have a wet look that brings the most coloring out of the precious shell as if it were wet in it’s native environment.
All ©Copyrights Reserved by Ron and Kristi Percell 2004-2017
There are no products to list in this category.